To force a Git pull, use the command `git fetch –all` followed by `git reset –hard origin/your-branch`. This ensures your local branch matches the remote repository.
Git is a powerful version control system used by developers worldwide. Occasionally, you may need to force a pull to overwrite local changes and sync with the remote repository. This process ensures that your local branch is an exact copy of the remote branch, preventing conflicts and discrepancies.
Knowing how to force a Git pull is essential for maintaining code consistency across multiple environments. It is a straightforward process but should be used cautiously to avoid losing important local changes. This guide will help you understand the commands and their implications, ensuring a smooth workflow.
Introduction To Git Pull
Git is a popular version control system. Developers use it to manage code changes. Git Pull is a command in Git. It updates your local repository with changes from a remote repository. This command is crucial for collaboration. It ensures that all team members work with the latest code.
Basics Of Git
Git tracks changes in code projects. It helps developers keep track of different versions of their code. Here are some basic commands:
- git init: Initializes a new Git repository.
- git clone: Copies an existing repository.
- git commit: Saves changes to the local repository.
Git uses branches to manage code versions. The main branch is usually called “main” or “master”. Developers create new branches for new features. This keeps the main branch stable.
Importance Of Syncing
Syncing ensures everyone works with the latest code. This avoids conflicts and errors. Here are the benefits of syncing:
- Prevents code conflicts.
- Ensures all team members have the latest updates.
- Helps in tracking progress and changes.
Git Pull is essential for syncing. It combines two commands: git fetch and git merge. Fetch downloads new data from the remote repository. Merge integrates this new data with your local repository. To force a Git Pull, use the following command:
git fetch origin main
git reset --hard origin/main
This command ensures your local repository matches the remote repository. Use it carefully as it overwrites local changes.
Force Git Pull Explained
Understanding Force Git Pull is essential for developers. It’s a powerful command in Git. It helps synchronize local and remote repositories. This blog section will explain its use cases and benefits.
What Is Force Pull?
Force Pull is a Git command. It overrides local changes with remote changes. This command ensures your local repository matches the remote repository. It’s useful when local changes are not needed or can be discarded.
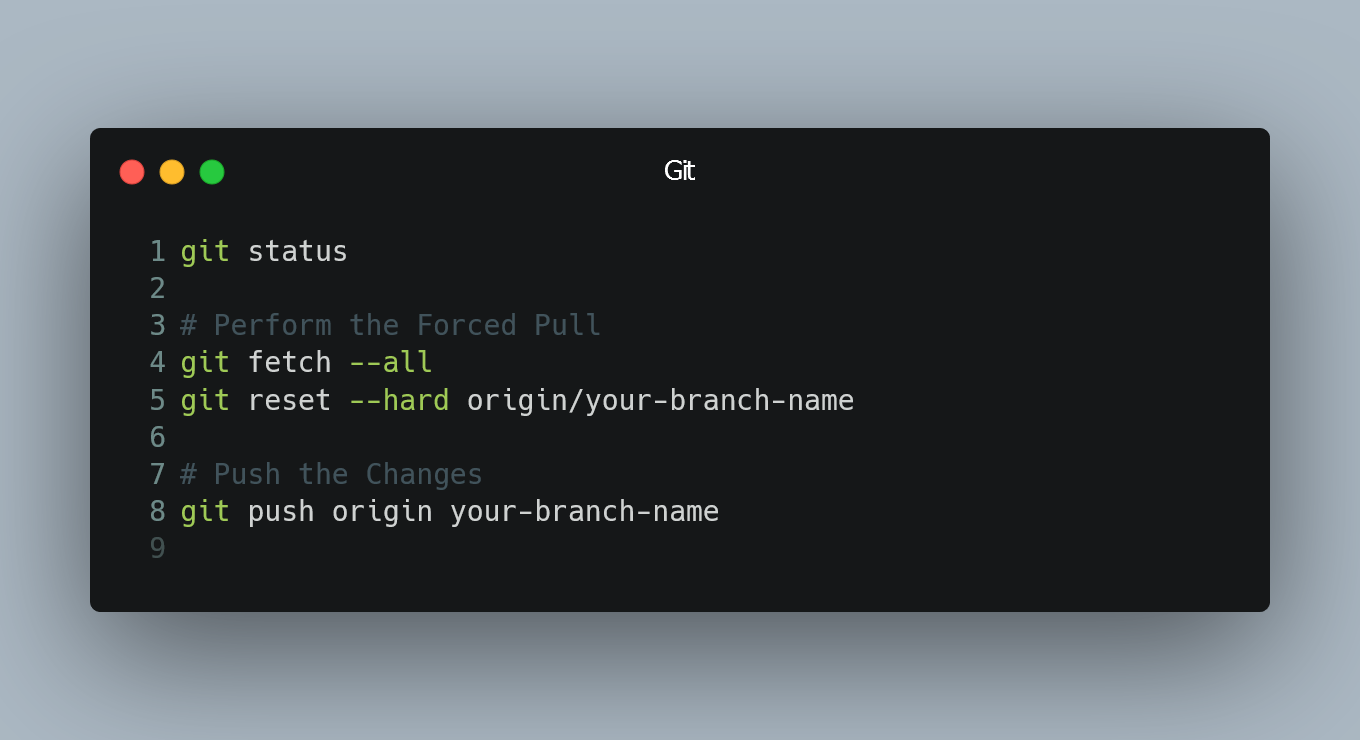
git fetch --all
git reset --hard origin/main
The command above resets your local main branch. It makes it identical to the remote main branch.
When To Use Force Pull
Use Force Pull in specific scenarios. Here are some examples:
- When local changes are unnecessary.
- When the local branch is corrupted.
- When you need to synchronize with the remote branch.
Avoid using this command if you have important local changes. Always back up your work before using Force Pull.
Let’s see some common scenarios:
| Scenario | Description |
|---|---|
| Local Branch Corrupted | Use Force Pull to reset and fix issues. |
| Unnecessary Local Changes | Override local changes with remote updates. |
| Synchronize Branches | Ensure local and remote branches are identical. |
Remember, always be cautious. Use Force Pull wisely.
Setting Up Your Environment
To force a Git pull, you need the right environment. This setup ensures your workflow runs smoothly and without issues. Below, we’ll guide you through the essentials of installing and configuring Git.
Installing Git
Installing Git is simple. Follow these steps based on your operating system:
- Windows: Download the installer from the official Git website. Run the installer and follow the instructions.
- macOS: Use Homebrew. Run
brew install gitin your terminal. - Linux: Use your package manager. For Debian-based systems, run
sudo apt-get install git. For RedHat-based systems, usesudo yum install git.
After installation, verify it by running git --version in your terminal. This command should return the installed Git version.
Configuring Git
After installing Git, configure your user information. This step is crucial for committing code.
- Open your terminal.
- Set your name with:
git config --global user.name "Your Name" - Set your email with:
git config --global user.email "your.email@example.com"
These settings will apply globally to all repositories. To set configurations for a specific repository, omit the --global flag.
Next, set up your default text editor. This editor will be used for commit messages. To use Vim, run: git config --global core.editor "vim". For Nano, use: git config --global core.editor "nano".
Below is a table summarizing useful Git configuration commands:
| Command | Description |
|---|---|
git config --global user.name "Your Name" |
Sets your name for all repositories |
git config --global user.email "your.email@example.com" |
Sets your email for all repositories |
git config --global core.editor "vim" |
Sets Vim as the default text editor |
git config --global core.editor "nano" |
Sets Nano as the default text editor |
By following these steps, your Git environment will be ready. You can now proceed with your workflow without any hitches.
Executing A Force Git Pull
Sometimes, you may need to force a Git pull. This action helps you overwrite local changes. This is useful when your local branch is out of sync. A force pull ensures you have the latest code from the remote repository. Follow the steps below to execute a force Git pull.
Step-by-step Guide
Executing a force Git pull is straightforward. Follow these steps:
- Open your terminal or command prompt.
- Navigate to your project directory.
- Run the following command to fetch all branches:
- Next, reset your local master branch:
- Now, pull the latest changes forcefully:
git fetch --allgit reset --hard origin/mastergit pull origin master --forceCommon Commands
Here are some common commands used in force Git pull:
| Command | Description |
|---|---|
git fetch --all |
Fetch all branches from all remotes. |
git reset --hard origin/master |
Reset your local branch to match the remote. |
git pull origin master --force |
Pull changes from the remote master branch forcefully. |
Use these commands carefully. Force pulling can overwrite your local changes. Ensure you have backups of important work.
Handling Conflicts
Handling conflicts during a force Git pull can be challenging. Understanding the reasons and how to resolve them is essential for smooth development.
Why Conflicts Occur
Conflicts arise when changes in your local repository differ from the remote repository. This happens if multiple people edit the same file. It can also occur if you edit a file and someone else changes it.
Conflicts are common during collaborative projects. Developers work on the same codebase simultaneously. Conflicts may also occur if you forget to pull updates regularly.
Resolving Conflicts
Resolving conflicts involves several steps. First, identify the conflicting files. Git will mark these files during a pull operation.
- Open the conflicting files.
- Look for conflict markers. They appear as <<<<<<<, =======, and >>>>>>>.
- Decide which changes to keep. You can choose your changes or the remote ones. Sometimes, combining both sets of changes is necessary.
- Remove the conflict markers after deciding.
- Stage the resolved files using
git add. - Commit the changes using
git commit. This resolves the conflict.
Using a visual merge tool can simplify the process. Tools like Meld or KDiff3 highlight differences. They make it easier to decide which changes to keep.
| Command | Description |
|---|---|
git status |
Shows the status of your working directory. |
git add |
Stages a file after resolving conflicts. |
git commit |
Commits the staged changes to the repository. |
Remember to pull changes regularly. This reduces the likelihood of conflicts. Also, communicate with your team. Inform them about the changes you are making. This can prevent conflicts.
Best Practices
Using force git pull can be risky if not done correctly. Following best practices ensures smooth workflows and avoids issues. Here are the key practices to follow:
Avoiding Data Loss
Before executing a force pull, always backup your changes. This prevents loss of important work. Use the following commands to create a backup branch:
git checkout -b backup-branchAfter creating a backup, you can proceed with the force pull:
git fetch --all
git reset --hard origin/main
Communicate with your team to avoid overwriting their changes. Collaboration prevents conflicts and data loss.
Maintaining Clean Repositories
A clean repository ensures smooth operations. Always keep your branches organized. Regularly delete branches that are no longer needed:
git branch -d obsolete-branchUse meaningful branch names to avoid confusion. For example:
- feature/add-login
- bugfix/fix-header
Regularly pull from the main branch to stay updated:
git pull origin mainResolve conflicts promptly to maintain a clean history. Always review changes before merging them.
Advanced Techniques
When you master the basics of Git, you can use advanced techniques. These methods help automate and streamline your workflow. Let’s explore some of these advanced Git techniques.
Using Git Hooks
Git Hooks are scripts that run automatically at certain points in your Git process. They can help enforce policies and automate tasks. There are two types of Git Hooks: client-side and server-side.
- Client-side hooks run on your local machine.
- Server-side hooks run on your Git server.
Common hooks include pre-commit, pre-push, and post-merge. These hooks can execute scripts to check code quality, run tests, or notify team members.
Example: Pre-commit Hook
A pre-commit hook checks code before committing. Here is an example:
#!/bin/sh
# Check for any linting errors
npm run lint
if [ $? -ne 0 ]; then
  echo "Linting errors found. Commit aborted."
  exit 1
fi
Save this script in the .git/hooks/pre-commit file. Make sure it is executable with chmod +x .git/hooks/pre-commit.
Automating Pulls
Automating Git pulls ensures your local repository stays updated. This can be done using cron jobs on Unix-based systems or Task Scheduler on Windows.
Using Cron Jobs
Create a shell script to pull the latest changes:
#!/bin/sh
cd /path/to/your/repo
git pull origin main
Make the script executable with chmod +x /path/to/your/script.sh. Then, set up a cron job:
crontab -e
# Add the following line to run the script every hour
0     /path/to/your/script.sh
Using Task Scheduler
For Windows users, create a batch file:
@echo off
cd /D "C:\path\to\your\repo"
git pull origin main
Save the file as pull.bat. Use Task Scheduler to run this batch file at regular intervals.
| Platform | Tool | Script Type |
|---|---|---|
| Unix | Cron Jobs | Shell Script |
| Windows | Task Scheduler | Batch File |
These advanced techniques can save time and reduce errors. Implementing Git Hooks and automating pulls are powerful steps in your workflow.
Troubleshooting
Encountering issues while performing a force Git pull can be frustrating. This section provides solutions to common problems. Learn how to troubleshoot effectively.
Common Issues
When using force Git pull, several problems may arise. Below are some of the most frequently encountered issues:
- Conflicts between local and remote branches
- Corrupted or incomplete repository data
- Authentication issues with Git servers
- Network connectivity problems
Effective Solutions
Addressing these issues requires specific steps. The table below outlines solutions for each problem:
| Issue | Solution |
|---|---|
| Conflicts between local and remote branches | Use git merge --abort and then git pull --rebase |
| Corrupted or incomplete repository data | Clone the repository again using git clone |
| Authentication issues with Git servers | Check credentials and use git config --global credential.helper |
| Network connectivity problems | Verify internet connection and try git pull again |
Below is an ordered list of steps to resolve conflicts:
- Run
git fetch - Run
git reset --hard origin/master - Execute
git pull
Always ensure your repository is backed up before performing force operations. This prevents data loss. If you face persistent issues, consult Git documentation or seek help from a Git expert.

Frequently Asked Questions
What Does Force Git Pull Mean?
Force git pull is a command used to overwrite local changes. It fetches and merges remote changes, discarding local modifications.
How Do You Force Git Pull?
To force git pull, use: `git reset –hard HEAD` followed by `git pull`. This will overwrite local changes.
Is Force Git Pull Safe?
Force git pull can be risky. It discards local changes and can lead to data loss. Use with caution.
When Should You Use Force Git Pull?
Use force git pull when your local repository is out of sync. It’s helpful for resolving conflicts.
Conclusion
Mastering the force git pull command is essential for efficient version control. It ensures your code stays up-to-date and conflict-free. With these tips, you’ll handle force pulls confidently. Keep practicing and soon it will become second nature. Happy coding!
Leave a Reply
You must be logged in to post a comment.